Wednesday, January 11, 2012

More fun with Chalkboard paint!


By now, you've probably noticed a trend here.  I like my new crochet love, and I am really liking to paint.  Especially with that Chalkboard paint!  Here's another little project I've been working on (will be a while until it's fully done though), based on the idea found here: Frugal Decor Mom - Kitchen Organization.

I wish I could say all my ideas are original, but they are not.  Every now and then I'll think up something not too bad, but it's usually based on previous work I've seen.  So, after seeing this idea pop up on, you guessed it, Pinterest, I figured it'd be a great way to organize all those random bags of spices I have in our cupboard, and in the future (after accumulating more pots), all the other spice jars we have that are all randomly matched up.  Will also make it easier to head to Bulk Barn to stock up, and also cheaper.

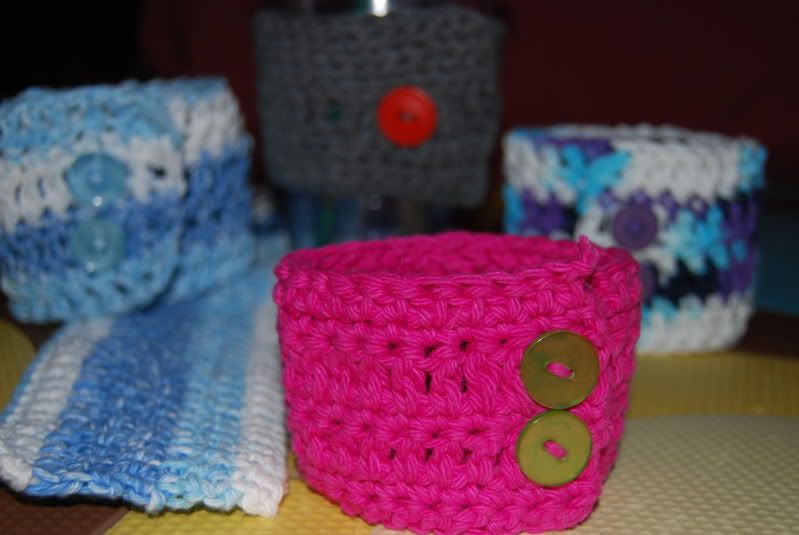
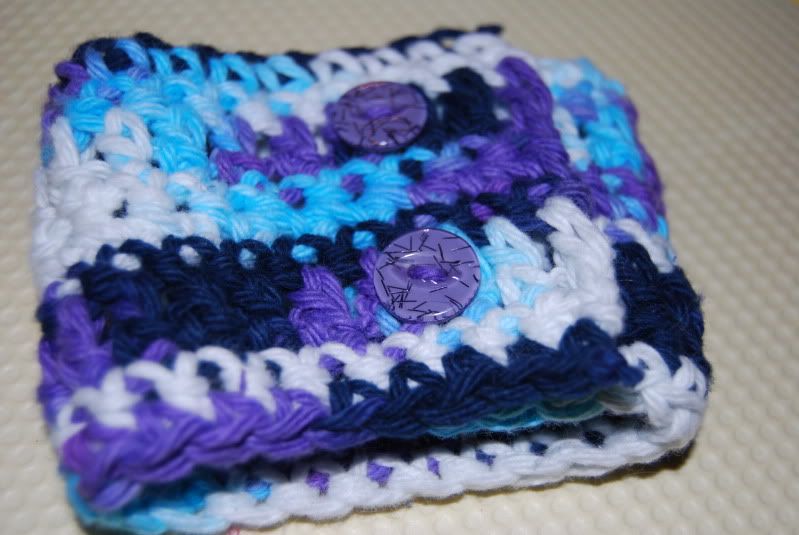
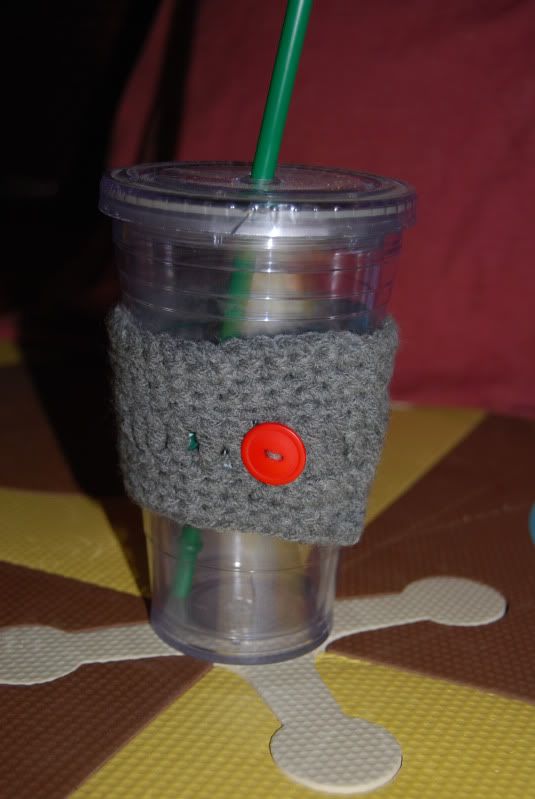
Here's the process and a few of the finished pots!  I'm pretty happy with how these turned out.


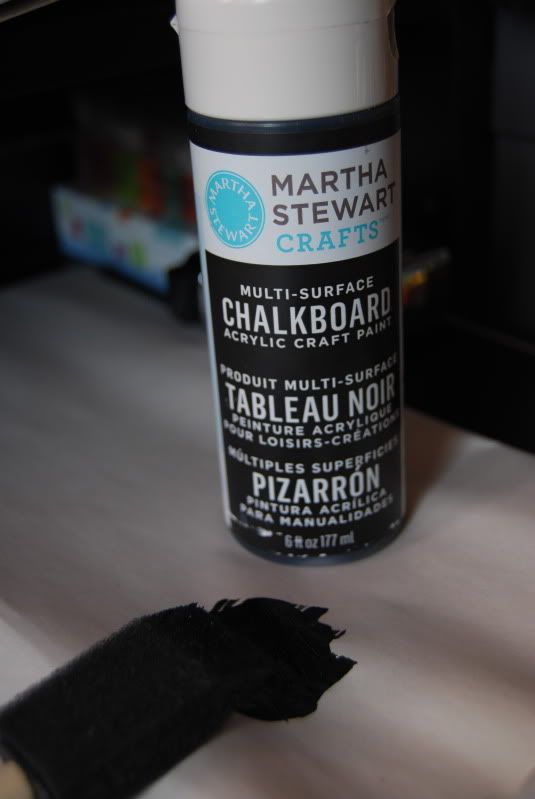
My trusty Martha Stewart paint.  So far, it hasn't failed me.


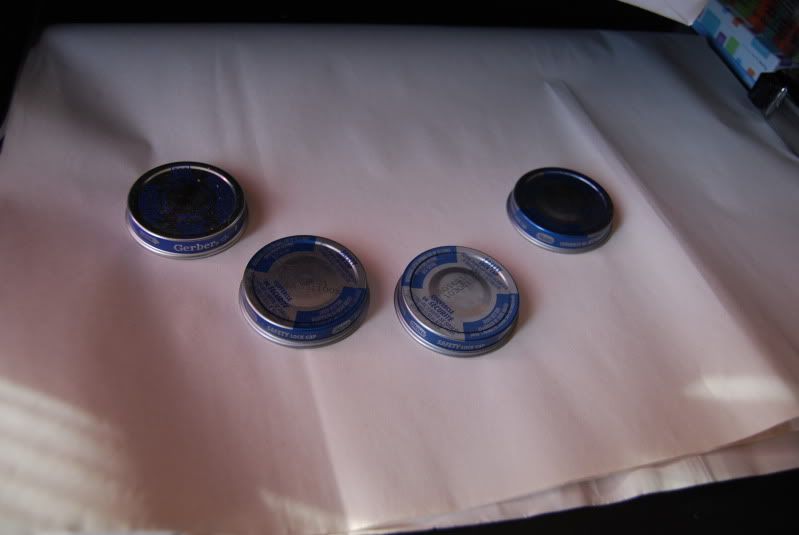
Lids, pre-painting.  I have never used primer for these projects, mostly cause I couldn't find it the first time around, but I can imagine it'd do a good job, and help a bit with the paint.

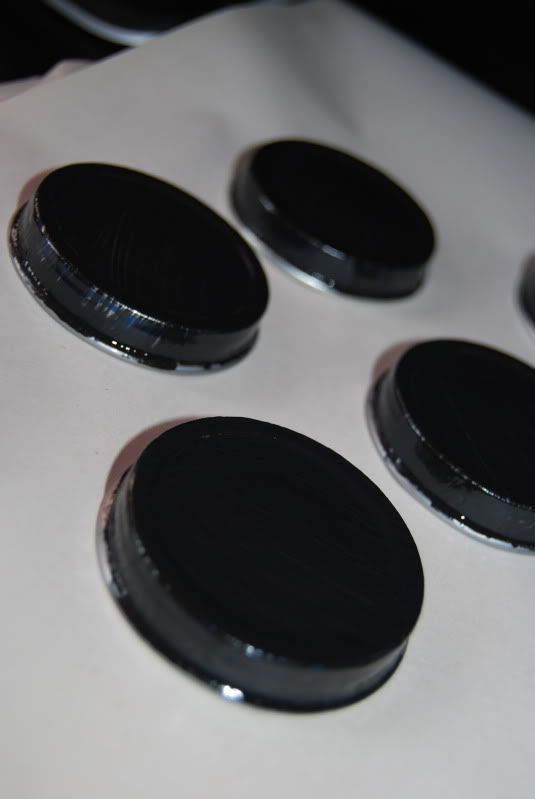
After one coat, these are the lids!!
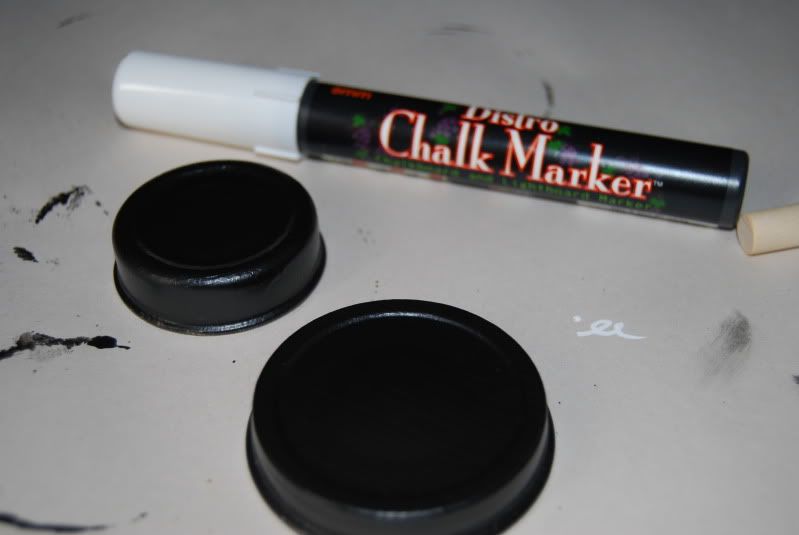
3 coats later, and my magic chalk marker (it just stays put longer), and this is the result...
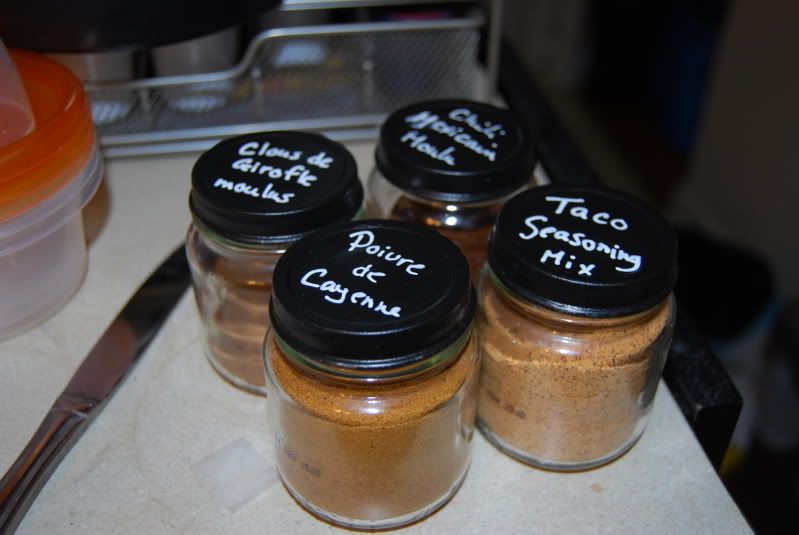
TADAH!  The 4 I have right now.


Alternate way to do it, same items: Magnetically.  It's really neat too this way.

Now, just need to find something to put them in my cupboard in, and we're golden!

Cheers!

Tuesday, January 10, 2012

My first hat!!

This is my second post about my recent endeavor in crocheting.  I set out to make my first hat, and it turned out not too awful.  Not quite what I was looking for, but it's nice and warm, and very fun.  Next time, it'll definitely be shorter.  I think that's my main complaint right now, it just looks too long.  The flower was a last minute add on, to help with the length.  I messed up the flower somehow too though.  Hopefully, practice will make perfect, right?  So, here it is!  Be honest, what do we think, people?

On me!
Close up of her...
My funky little flower
Here's the tutorial I used for the beanie/tuque: Crochet a Basic Beanie Tutorial
And the flower is from here: Crocheted Flower Pattern

Cheers!

Monday, January 2, 2012

Chalkboard Paint, I think I love you

I have recently discovered the awesomeness that is chalk board paint.  It's so much fun to use!!  And, to think you can draw on it, erase and start over; what's not to love!?

I was recently doing a secret gift exchange with an Ottawa group, and the lovely, awesome gal I got is a teacher.  Itried to find some fun gifts and ideas for her, and came upon this idea:

Taken from http://www.tipjunkie.com/18-creative-things-to-do-for-back-to-school/
Now, my original idea was to make a Flower Pen to put in it, but for some reason, the floral tape I found just didn't stick.  At all!  So, I just painted the pot for her, in a similar fashion to this one, and put some fun pens in it to use (she's moving soon, so figured a plant may not be the best idea for now).

Here's the version I made!

The Moi version!  Not as fancy, but pretty good.


I used some Chalk Pens to write and draw on the bottom part, and the back of this is all free to draw with real chalk.  Obviously, not as great as the original, but I think it turned out great!  I used the one from Martha Stewart, from Michael's, but for those who've seen the 'make your own' post on Pinterest, it apparently works great (as per same friend, who made it and used it).  Definitely a cheaper alternative, as the MS one is not cheap, and you can make whatever color you want, which can be hard to find sometimes.

I'm currently working on another pot, painted mainly with chalk paint.  Hopefully I can post the other one soon, along with my current project (currently drying on my desk).  There are also 2 other projects involving this paint that are on the go.  Hence the not posting much lately.

Cheers!

Santa Cookies

When you're growing up, certain things are lots of fun.  Christmas being one of them.  There are certain aspects, though, you really don't think you'll give a darn about until you're older.  Santa cookies being one of them.  I think, growing up, Santa got ChipsAhoy's in our house.  Being a new mommy, in a world where everyone can get great ideas online, ChipsAhoy's weren't going to cut it for my little man's first Christmas.  No Siree Bob!

I tried to decide what would make a good cookie for the Big Fellah.  There's lots of options really, and no one seems to agree on his favorite kind of cookies (you'd think he could just Tweet the answer and make us mom's lives easier), so I remembered a great gift idea I had saved up and how cute those looked.  Plus, they have oatmeal, so they're kinda healthy, right?  How can Santa not love Yummy and kinda healthy.

So, off the the Interwebz I went, and found my recipe.  It's a slightly modified version of these great Bakerella cookies in a jar.  Only difference is the M&M color, really.  Oh, and the fact that for some reason, I couldn't fit any nuts in my jars.  They seemed big enough!  So, I made 2 jars of them.  One I gave to a lovely friend of mine as part of a Secret Gift Exchange we were doing, and the other I ended up keeping for myself.

The mix, and my pretty new mixing bowl for the holidays.
The only thing they don't mention on either blog, and I wonder if I did it wrong, is the fact that the darn Brown Sugar got so hard, it took more effort than anticipated to get it out.  It hadn't dried out, but packing it in really tight made it nearly impossible to get out with breaking the whole jar.  After that was fixed (thank you hubby), we had absolutely no issues, and soon enough, we were ready to cook them up!

Love my Stoneware!!  Makes baking cookies SO easy and foolproof.

Little side note here.  I used my new Pampered Chef bar pan and it gave me GREAT results!!  All my cookie sheets are done for, to the point that I can barely use them even with my fake silpat, or even Parchment paper.  I'd never baked on it before, just made veggies, fries and random pieces of meats and appies, but it worked great with the cookies.  Might need to get a second one in the future :)

OK, so we cooked them all up, got a bit over 2 dozen of them, did a taste test, and yup, these are the cookies Santa will be getting at our house from here on out.  Probably won't bother doing the jar part next year, but it made for a pretty picture, at the very least.

Ready for Santa

One thing we still can't understand though, is where the next picture came from...  I did leave the camera in the living room, cause we were scrambling to get in bed (it was passed midnight, after all)...  Wonder if Wayne and Lanny were around to help Santa out.


Not sure who took this one, as we were all snug in our beds.  Curious...

Cheers, and a slightly late Merry Christmas to everyone!

(And yes, I'm aware this isn't really a 'craft', but the jar sort of is.  I did get the lids all pretty with Christmas paper and Modge Podge)

Advent Calendar

Last post about Christmas, I promise!  I'm a big fan of those lovely, yummy chocolate calendars you can get every year.  I usually get hubby a Lego Advent Calendar, and I've been getting myself a Lindt one.  On a recent trip to Michael's, I found a paintable Santa one.  In my search for a new hobby, I figured this could be fun!  Little did I know it'd take me 3 months to complete it.  It needed quite a few coats, and the doors were a bit of a pain, since painting around the numbers wasn't quite doable.  In the end, I decided to do all the doors in Chalkboard paint (so we can change up the numbers every year), and the knobs in white and red.  Made it easier, but it's still not completely done, as the inside edges will need to be painted also (as you'll see in the finished picture)..  I'm fairly pleased with the end result, but at the same time, wish it turned out a bit better.  We did mess up the star on the tree, and Santa's face isn't done yet.  Hopefully I can finish him all next year before Christmas and use it with the little man.

Here he is after just the white parts were done (I think this is one coat).

You can't really see how weird Santa looks now...

And the completed (so far) version:

But he looks a bit misshapen when painted.
Another fun little thing I did this year, was show off our Christmas cards in a new way.  I was tired of just putting them on a shelf, so I had found a post about putting them on a ribbon on a door in the kitchen, and sure enough, it did look quite festive.  Hoping to do it again next year, but with new clothespins and on a few more doors too, so it's less cluttered.

Love getting cards!!
OK, this should really be the end of Christmas-y things, at least until next September.

Cheers!

I like my coffee warm and cozy, please!

As mentioned in post #1, I recently learned to crochet.  A dear friend of mine (*waves*) was telling me about how easy it is and fun, and sure enough, I needed a new hobby, as I'd repeatedly been told by certain people, so away I went to YouTube to learn how to crochet (I used Art of Crochet by Teresa to learn, and it's really great!).

Being me, I looked at the video, tried a couple of times and didn't quite get it.  Then, all of a sudden, I had a couple of rows done.  Woot!  Kept going, and going, and sure enough, I had a weird looking square.  I really should have taken a picture of that first attempt.  It was uneven, and wavey, and odd, but I had done something.  After a while, and more of my weirdly deformed square, I went back to the trusty YouTube video and, wouldn't you know it, I was doing it wrong.  It wasn't supposed to be wavey at all!  And I kept forgetting the last part of the rows, hence why it was always shrinking.  I unravelled the whole thing, and started over, and got a normal quare.  It's nothing exciting, far from it, but it's my first, real, not deformed or wavey square.  We now use it to wipe baby puke. :)  Oh, and still haven't found out what the name of the wavey stitch is.

Then, I started to think, what could I make with my new found hobby.  Off to Pinterest I went, and sure enough, I came upon this Pin.  I read the instructions, sent a message to my friend asking if I understood all the abreviations correctly, and back to YouTube I navigated to try and learn a few more crochet techniques (which I learned a few days ago, I was starting off wrong), and then I made my first item: a Cup Cozy :)  The sizes she used seemed a bit odd to me, so I made a few modifications, but all in all, I think they came out pretty great.  Someone also mentioned that the 29 chain she starts with can be small for a Starbucks cup, the intended cup size of my cozies, so I made them somewhere between 30-35 instead.

I made the Pink one first, and I love it.  It's fun and quite me.  A mommy friend of mine saw it last week and was asking if I got it on Etsy.  That kinda made my day, I have to admit.


I kept at it, for a while, changing up the pattern, how many single crochet rows and double ones.  I switched up my hook, as I broke the first one I got (cheap plastic 5mm), and the new one was a tiny bit bigger (nice bamboo one, but 5.5mm) and it gave much different results.  Then, I got hubby's Christmas gift of a new normal sized hook (Metal, 5mm), and learned how to make a triple crochet stitch and made him his own cozy, the grey one in the back.  It probably looks the best, only cause I learned how to properly start my darn sequence.

The light blue and the purple/blue ones with buttons were made using a 5.5mm hook. The version on the floor (just needs buttons) is with the 5mm hook.  Quite a difference in size up close.


This was made using the same pattern and hook size as the Pink one from above.  LOVE the buttons on here!


This one is made with the 5mm hook, and a different pattern than listed on the original blog.  It's about 4-5 rows of single crochet, then triple crochet for the holes, and another 4-5 of singles.

I am currently working on a new version, using that first 'I'm doing it wrong' technique - cause the wavey pattern is kinda neat! - and should be able post it soon.  Also figured out a different way to make the holes, which was neat.  I don't know why, I've always been good at learning things on my own (at least, until I know the base work properly), so it's nice that I'm figuring certain stitches on my own now too.

So, there we have it!  My start in crochet-ing.  I'm by no means a pro at this, I just like to be crafty, and this is certainly a great venue for that.

Cheers!